Rolling Computer Case

This is a re-post of a brilliant idea (at least I thought so) that I had a few years back. As an update, the iLugger is now available for the 27″ Mac computer at a cost of $199.00, or you can go for the gusto with the Tenba 27″ case for a whopping $654.95. Truthfully, my idea really was meant to serve the purpose of bringing my large computer safely to the Apple Store when I needed to, and for that it could be the best $20 you’ll ever spend. If you are in a situation where you have to travel with a computer of this size safely, this probably would not be the way to go. However, if you have to take your computer in for servicing or for any reason, this is a back saver.

Computer Travel Case

Originally published on November 11, 2009

OK. This was one of my better ideas.

I am extremely fortunate to have the new 27” iMac computer. My kids were using the computer so much now for homework and such that I found it hard to get some ‘screen time’. I’d been bugging my husband about it for 2 years, and we finally just bit the bullet. Fortunately for me, the new 27” iMac had just been released days before and was the same price as the old 24” iMac was.

This is the original box that my iMac came in


The problem with this big, beautiful computer is that learning how to create this web site has required weekly, if not more often, one-to-one training at the local Apple store.  Lugging this computer down to the Apple store all the time is really awkward and heavy. The box is a whopping 30” x 24” x 9.5”. I don’t even know what it weighs. They make this thing called the iLugger, but not only is it really expensive, it’s not available yet for the new 27” iMac. It dawned on me this morning that, just like on the lemonade stand that I built, I could attach simple rolling caster wheels to the bottom of the box and away I’d go.
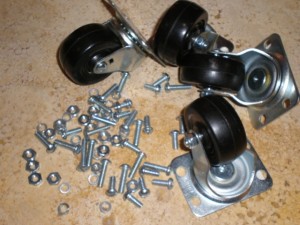
4 rolling casters with mounting plates, bolts, washers and nuts are all you need. You may want to invest in a different handle than the one that's built in to the box; a strap handle mounted on one end of the box would be super.


Mark all of the holes for the mounting plates and pre-drill. You want to make sure your bolts aren't so long that they'll poke the computer in any way.


Attach castors to box using bolts, washers and nuts.

 A quick trip to the hardware store where I purchased 4 2” rolling caster wheels with a screw-in plate, 16 bolts  about 3/4” to 1” long.appropriately sized for the caster’s plate holes and 16 locking washers and nuts. For $19.25 and a half hour of labor I have a rolling computer case that I barely have to lift at all.

Finished rolling computer case.

Now isn’t that a good idea?
Pin It

Columbine

I love Columbine. It has to be the easiest perennial in the world. They re-seed themselves (but not crazy like a week) and the new plants always seem to have morphed into some new color or shape flower - or at least mine always do.

The Demise of iWeb & the Allie Diet Plan


On June 30th iWeb will disappear from Apple. Everyone has to move over to “the Cloud”, whether they want to or not. I’ve already made the transition in most ways, but my original website, www.craftyfarmgirl.com, was created in iWeb. This site originated on November 3 of 2009 and ended when I made the switch over to WordPress and craftyfarmgirl.net on December 5, 2010. I’ve only re-posted maybe 2 original posts from that site, but when I was telling my friend Lorraine the other day that at the end of the month the original Crafty Farm Girl site was disappearing forever she implored upon me to transfer the best of the best over with haste. She recalled this post below and said that when she read it was when she realized she had to get to know me better (our sons were already good friends).

It was also the post that drew a line in the sand with my husband and me – apparently a client that he’d told about the site had read this post and made some comment to him about it. He came home that evening telling me that I couldn’t post things like that anymore because he referred clients to my site all the time. I told him to stop referring clients then because I wasn’t going to stop saying things like this. The end result was that he didn’t stop referring clients to my site and I didn’t stop saying what I wanted.

Alli Diet Plan

Originally posted on www.craftyfarmgirl.com on Saturday, June 12, 2010

In my continual effort to lose the ghastly amount of weight I’ve put on over the past few years, on Friday I started the over-the-counter FDA approved Alli diet. I’m not sure what you know about this diet if you know anything at all, but essentially it blocks some of the fat that you eat from being absorbed.


If you stick to the recommended fat intake of 15 fat grams per meal all is supposed to be fine. However, if you go out and eat a Big Mac or a bucket of Kentucky Fried Chicken for dinner, you’re going to suffer from what the makers of Alli nicely calls “treatment effects”.

Basically you shit your pants.

Wow.

That is one motivating factor to keep me on the straight and narrow. It’s been two days, and so far no “treatment effects”.

If you want to read a hysterical article on Alli you can check out this link. Don’t read it if you’ve got a sensitive stomach.

Alli Side Effects in Layman’s Terms

Even though I’m taking the pill I can’t read this stuff and not laugh out loud.

I imagine I won’t be laughing if I’m suffering some of those “treatment effects” though while shopping at Target or something.

I’ll keep you posted on the success (or failure). In the meantime, you might want to give me a wide berth if you run into me at the grocery store.

……………………………………………………………….

As a follow up to this post I have a few things.

Is this pill still even on the market? It was so hot when it came out and I haven’t heard a word about it lately.

It didn’t work at all for me. I stuck to it perfectly for like 2 weeks and didn’t lose any weight so I gave up. Those side effects can only be worth the risk with visible results in my opinion. I guess things like this are just one of those things that since the dawn of time and until the end of time people that are desperate to lose weight will still buy, clinging to the hope that “this one” will work for them.

I did eventually lose a lot of the weight that I had gained I am happy to say. There will always be more to lose and I’ll never be as skinny as I used to be, but I’m fairly happy with how I am now. That’s something.

Also, if you read me way back when or even just recently been through my old site and saw something that you think shouldn’t disappear into cyberspace forever, just send me a comment and I’ll try to get it transferred over for others to enjoy.


Egret Lunch

Because we live along the coast we are fortunate to have beautiful water birds like egrets and herons in seemingly every lake, pond and stream. This lovely egret was looking for his lunch on Memorial Day as my family was heading to the annual Post 53 Food Fair after the parade.

Peanut Butter Sandwich Cookies

The Litchfield County area of Connecticut is beautiful, and I happen to have spent a lot of time there this winter and spring for 2 reasons; 1) it’s where I ride. Although it’s always a full-day event for me as it’s about an hour an 10 minutes drive to get there, it’s worth it for the amazing trainer I have. She won the title of National Reigning Horse Association’s Rookie Professional World Championship in 2008 at the age of 42 only two years after she started training for it, or even riding western for that matter (she was an English hunter jumper prior to the switch), and 2) it’s where my never-ending hunt for the perfect farm has taken me to, so I am constantly searching the latest real estate listing in the area.

But I digress.

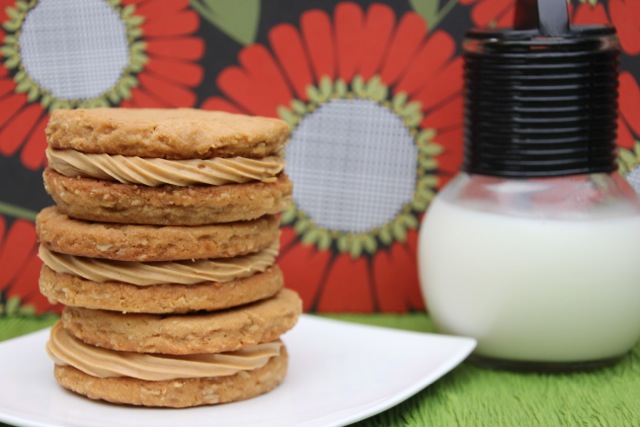
There is a terrific bakery in the small town of Kent called the Millstone Cafe and Bakery. They always have the most delicious peanut butter sandwich cookies, and inevitably I end up in there for a cup of coffee and one of those cookies for the ride home. I’m not normally a huge fan of peanut butter cookies, but the addition of the peanut buttery/buttercreamy filling really made the difference for me. I decided I needed to try and replicate them.

I came across a few recipes in my internet searching, but the one on We are Not Martha that was adapted from Tom Collicchio’s ‘Wichcraft cookbook. Being a huge Tom and Top Chef fan, I decided this one looked pretty good to me. I did make a few changes from their recipe in the icing. I wanted more of a peanut buttercream icing so I reduced the amount of peanut butter and increased the amount of butter. Also, when a recipe doesn’t specify light or dark brown sugar but just calls for “brown sugar”, I’ll think about it a bit – whether the recipe can stand up to the stronger taste of dark brown or needs the more delicate light brown – and usually end up using about 1/2 of each combined together and call it a day, which is what I did for this recipe.

No let me say right now that I made a double recipe of these cookies and cut them with a 3″ cutter. At that size they truly made a meal. When I make them again I will probably use something closer to a 1-1/2″ cutter so you can actually eat one in a sitting and not have to stage it throughout the day. I am embarrassed to say that I ate more than my fair share of this batch. Also, the toasted oats are the KEY to this cookie and you do not want to miss this step. It’s one of those cooking “aha moments” when you wonder why you’ve never seen a recipe that calls for it or thought of it yourself because it tastes so amazing and adds so much more flavor to the cookie.

I also forgot to photograph most of the steps in this process, which goes to show how much I really was taking a blogging vacation. None of the steps are hard, but if you want good photos click the link to the blog I adapted the recipe from – she’s got some good photos.

Peanut Butter Sandwich Cookies

Recipe adapted from We are Not Martha who adapted it from Tom Colicchio’s ‘witchcraft book.

(makes 12 or more, depending on the size you make – see note above)

  • 1/2 C (1 stick) plus 4 T butter, room temperature
  • 1 cup old-fashioned oats
  • 1 cup all-purpose flour
  • 1 teaspoon baking soda
  • 1 teaspoon salt
  • 1/3 cup granulated sugar
  • 1/2 cup packed brown sugar
  • 1/2 cup peanut butter
  • 1 recipe for peanut butter filling (below)

(Pre-heat oven to 350 degrees)

In a small saucepan over medium heat, melt the 4 T of butter. When it’s melted, pour in the oats and stir for about 5-7 minutes, until browned and toasted. Lay a piece of parchment paper on a cookie sheet and when the oats are done toasting, pour them on the parchment paper.

In a medium bowl, whisk together the flour, baking soda, and salt. Set aside.

In the bowl of a mixer, combine 1 stick butter, brown sugar, and granulated sugar with the paddle attachment. Add peanut butter and continue mixing until well-combined. And delicious looking. Now, add the flour mixture and mix until just combined. Add in the oats, too, and combine. But don’t mix too much or the oats will break.

Place the dough on a piece of parchment paper and put another piece of parchment paper over the top. Roll the dough out with a rolling pin, until it’s about 1/4 inch thick and even. Slide the dough onto the back of a cookie sheet and stick in the fridge for about 20-30 minutes.

When the dough is done chilling, place it on the counter and take the top sheet of parchment paper off. Using a 2-inch round (or smaller; see note above)  cookie cutter (or biscuit cutter), cut an even number of  cookies out of your dough. Line two baking sheets with parchment paper and place cookies about 1 inch apart on sheets. You can re-roll the scraps once, refrigerate the dough again, and cut out some more cookies with the scrap dough as well.

Bake the cookies for about 10 minutes, rotating sheets halfway through, at 350 degrees. Transfer the cookies to wire racks so they can cool completely. Note that these cookies are very delicate when they are hot so handle them with care. They do get a little easier to handle once they cool off.

Peanut Butter Filling:

  • 4 tablespoons unsalted butter, room temperature
  • 1/2 cup peanut butter
  • 1/2 cup confectioners’ sugar
  • 1/2 teaspoon salt
  • Fill a pastry bag (or ziplock bag with the corner tip cut) with the peanut butter filling. Flip every other cookie over and fill the cookies with the bottom facing up. Put the other cookie on top and admire the beautiful sandwich you have created.


    Pipe the icing onto the cookies that you have placed top down on the rack.

    Top with the remaining cookies, face up. to complete the sandwich.

    I found that because of the butter in the icing that these cookies were best kept in an airtight container in the refrigerator, but take them out of the fridge 5 or 10 minutes before serving.


    Print This Recipe Print This Recipe Pin It

    Shou-Sugi-Ban Vertical Succulent Garden

    For Mother’s Day Jim and the kids bought me a few vertical succulent garden containers and dozens of beautiful small succulent plants. I had expressed an interest in trying these gardens out, as I’d seen a few really cool ones web surfing and on Pinterest recently.


    Jim looked around a few nurseries and decided this plastic style seemed to be the best. I liked them in the fact that if one plant dies, it is in it’s own individual cell and the plant can easily be removed and replaced, but once you’re done planting it you still have an ugly plastic container on the outside. I saw in my research for this post that Home Depot is selling a frame for these Grovert wall gardens, but at $139 a piece that’s a pretty stiff price tag for a small garden frame.


    This amazing vertical garden (below) and the one shown top left is actually made from many Grovert garden panels put together into one big frame.


    Jim had said that there were other options, so I went to check them out and came home with this unfinished pine wood frame very similar to a style I had seen on Etsy. It’s a hand made frame that was available at a local nursery.

    Unfinished vertical garden frame

    So now I had a garden frame I generally liked that was a better size, but it was still ugly.

    And plain.

    And boring.

    In my constant daydreaming of moving to a bigger, better and larger farm, I am always working on the design of this house in my head. Not too long ago I came across a very unusual Japanese wood treatment called Shou-Sugi-Ban. I’d love to incorporate some of this into my new farmhouse someday.

    Shou Sugi Ban is an ancient Japanese exterior siding technique that preserves wood by charring it. Traditionally, Sugi, or Japanese Cyprus, was used. Here in the U.S. you'll find Douglas Fir, Cyprus, and Oak species used. The process involves charring the wood, cooling it, cleaning it, and finishing it with a natural oil. Although time consuming, the final product is not only gorgeous, with its rich, silvery finish; the charred wood also resists rot, insects, and fire and can last up to 80 years!

    A house using Shou-Sugi-Ban burned wood siding.

    Another house constructed using Shou-Sugi-Ban burned wood siding.

    This fireplace was surrounded with shou-sugi-ban burned wood siding. I love this look.

    Since it’s hard to even find much information on it, and there are only a few suppliers of it to be found in the U.S., I figured I could always do it myself when it comes time to build my dream house. This seemed like the perfect opportunity to give it a whirl.

    I had the hose on and ready along with a full spray bottle of water at hand for putting out any stubborn flames. Using my torch attachment and a small propane tank (you can get these at any home improvement center), I started on the sides of the frame in case it really was a disaster.

    I started on the back of the frame.


    It took a little playing with to figure out exactly how much burn seemed to be the right amount, but you really want it to burn the entire surface of the wood.

    You really want to burn the entire surface of the wood.


    When I was finished with the sides I felt comfortable enough to move on to the front of the frame.

    I didn't burn the inside planting areas as I knew those would be covered with dirt and plants.


    Sometimes it took a squirt or two from the spray bottle to get a fire out.

    Sometimes it took a squirt or two from the spray bottle to get a fire out.


    Here is the frame all burned but not yet finished.

    The frame is all burned but it's not finished yet.


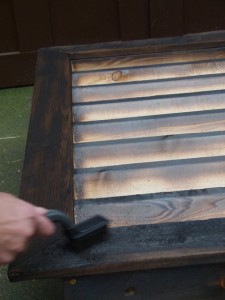
    Using the softest wire-bristled brush you can find (I think that might be an oxymoron?), gently scrape away most of the burned ash. The next time I do this I’m going to find an even softer brush as I really loved the color of the burned wood – a black silvery gray color.

    Using a wire brush, scrape away most of the burned ash.


    This is what it looked like after I’d scraped away most of the ash.

    This is what it looked like after I'd scraped away most of the ash.


    And here’s a close-up.

    And here's a close-up.


    The last step was to finish it with a clear sealer. I used a clear decking stain; I’m not sure that is what you would use for a house siding application, but it seemed good enough for a garden planter. I’ll research it some more before I go finishing my farmhouse siding.

    The last step was to finish it with a clear sealer. I used a clear decking stain


    Now to plant it. I used a soil mixture of quality topsoil and lots of vermiculite to make it nice and light.

    The finished frame is ready for planting.


    All done! Now I’ve just got to figure out where to hang it. I really planted this in my head for my new farm house. I just can’t seem to find the right spot for it here.

    All done!


    And this is what it looks like just a few weeks later. I think we’ve had perfect weather conditions for succulents – not too hot and lots of moisture.

    And this is what it looks like just a few weeks later.


    I love the way such a simple treatment really changed the frame so much. Now I’m going to make some frames for the 3 plastic Grovert containers Jim bought me. There is no way I’m paying $139 for those. I’ll let you know how much I save.

    Pin It

    Pink Peonies

    I am alive. I apologize for my blogging silence this past month – it wasn’t really planned but it was sort of unavoidable – there are only so many hours in a day. I promise I will post updates on everything very soon.

    All of the rain we had this late spring must have contributed to a spectacular year for my peonies.

    Flowering Quince

    I was up in Kent, Connecticut, a few weeks ago and came across this magnificent hedge of flowering quince just coming into bloom.

    Lasagna Soup

    I made this soup a few weeks ago. We had a very mild early spring followed by some chilly, raw days. I knew once the heat of summer came my interest in soup would fade until fall, so I took advantage of the day and made this recipe. It was easy to put together, and it really tasted just like lasagna in soup form. I will definitely be saving this recipe to make again.

    I forgot to pick up basil at the grocery, so I omitted it when I made it. Try not to be like me – remember the basil. It tasted great without it though, but I can imagine that extra fresh taste of basil would have been great.

    I also did as they suggested and cooked the pasta separately to prevent the leftovers from getting mushy. I froze the leftovers with a separate baggie of cooked noodles and another bag of cheesy yum; both taped to the top of the soup container with a label.

    Source: I found the recipe via Pinterest on A Farmgirl Dabbles blog, who said it was adapted from 300 Sensational Soups by Carla Snyder and Meredith Deeds, as seen in the February-April 2011 edition of At Home with Kowalski’s magazine.

    Lasagna Soup

    Servings: 8

    Ingredients

    for the soup:
    2 tsp. olive oil
    1-1/2 lbs. Italian sausage
    3 c. chopped onions
    4 garlic cloves, minced
    2 tsp. dried oregano
    1/2 tsp. crushed red pepper flakes
    2 T. tomato paste
    1 28-oz. can fire roasted diced tomatoes
    2 bay leaves
    6 c. chicken stock
    8 oz. mafalda or fusilli pasta
    1/2 c. finely chopped fresh basil leaves
    salt and freshly ground black pepper, to taste

    for the cheesy yum:
    8 oz. ricotta
    1/2 c. grated Parmesan cheese
    1/4 tsp. salt
    pinch of freshly ground pepper

    2 c. shredded mozzarella cheese

    Preparation

    Heat olive oil in a large pot over medium heat. Add sausage, breaking up into bite sized pieces, and brown for about 5 minutes. Add onions and cook until softened, about 6 minutes. Add garlic, oregano, and red pepper flakes. Cook for 1 minute. Add tomato paste and stir well to incorporate. Cook for 3 to 4 minutes, or until the tomato paste turns a rusty brown color.


    Add diced tomatoes, bay leaves, and chicken stock. Stir to combine. Bring to a boil and then reduce heat and simmer for 30 minutes. Add uncooked pasta and cook until al dente. Do not over cook or let soup simmer for a long period of time at this point, as the pasta will get mushy and absorb all the soup broth. You may even want to consider cooking the noodles separately, and then adding some to individual bowls before ladling the soup over them. This would be an especially smart move if you are anticipating any leftovers. Right before serving, stir in the basil and season to taste with salt and freshly ground black pepper.


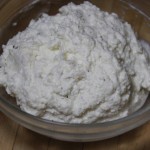
    While the pasta is cooking, prepare the cheesy yum. In a small bowl, combine the ricotta, Parmesan, salt, and pepper.


    To serve, place a dollop of the cheesy yum in each soup bowl and sprinkle some of the mozzarella on top. If you’ve pre-cooked the pasta, place some in the bowl now, and then ladle the soup over them. You can sprinkle a little mozzarella on top of the soup if you would like. Serve hot with a good crusty bread.


    Print This Recipe Print This Recipe

    Pin It

    Bird on a Wire

    This bird and I were singing back and forth to each other until a big 'ol truck came by and scared him away.